December 25, 2009
Javascript Color Picker
this nice javascript will show the hex code for all color. This script is a MUST if you are a webdesigner.
December 24, 2009
How to configure cron job in windows
cron job can make your life easier than you ever thought. even though, cron job is not much popular in most web hosting that running windows as their platform. Most people that have a script to automate their website (i.e backup) tend to choose web hosting that run in Linux because setting up cron in Linux is far more easier than in windows.
SOME NOTE
This tutorial is based on Windows XP SP2 build 2.6. But, the step should be the same with all windows version
STEP 1
open Scheduled Task.
You should now have this nice windows appear on the screen.

STEP 2
double click on Add Scheduled Task

Press Next.
Choose your favourite Browser. In this tutorial, i choose Mozilla firefox.

Press Next when you done.
Now, put the name of cron Job. Here, you can see that i put Cron Tutorial, and of course you can put whatever you like.
In This step also, you must choose the time when Windows executed the cron job. Here i choose Daily

Press Next when you satisfied.
Choose the time for the cron job to start. By default, current time will be shown in the input boxes.
the next option is to tell the scheduler to run your cron job.
The dropdown boxes is to tell the scheduler when to start your cron job. By default, current date will be shown.

Press Next when you done.
This screen is the tricky part. If you only have ONE user in your computer, it is advisable to create one more user with any privilages (i.e any privilages can be use Admin or Limited) plus you MUST provide a password for the newly created user.
If do not wish to create another user, and your current user already password enable then you can use your current user in the next screen.
If your current user do not have password, then you must create password for it or you can choose to create another user with password enable.

Press Next when you done.
On the next screen, before you press Finish make sure you check the check box that say "Open advanced task when i click finish"

Now We finish setting up the cron job. Next step is to tweak your cron job a little bit.
STEP 3

This will be on your screen right now.
To make sure that your cron job running correctly, you must provide the full path of your script. in this example, our script will be located in this location;
Please see the path carefully. Normal path in windows will be like this:
on the above screen, put the full path to your script next to C:\PROGRA~1\MOZILL~1\firefox.exe
so, the screen will look like this:

the value in Run textboxes will be like this:
there is a space in between C:\PROGRA~1\MOZILL~1\firefox.exe and D:/xampp/htdocs/path/to/cron/script.php
Next, go to Schedule tab and click the Advanced button.
Here will be the screen that you should see.

when you click advanced

check the check box next to Repeat task and fill the content to your like.
here is my setting(i.e you may tweak it to suit your need)
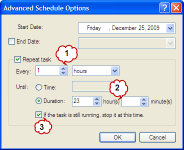
My reason:
1 : i want the cron job to run every 1 hour
2 : the cron job will run for 23 hours a day continuously
3 : the cron job will be terminated if it still running when the time to run the cron job come again.
STEP 4
to check whether your cron job is running as you wanted, you can change the time by double-clicking your cron job and go to scheduled tab. Alter the run time to past 5 minute or less with your current time.
After that, you can read some other article in this blog while waiting for that 5 minutes. hee~~
When the time come, you might expect your browser to pop-up and start executing your script. Well, you are wrong!! You will not see the browser to pop-up as you expected because it will run in the background silently.
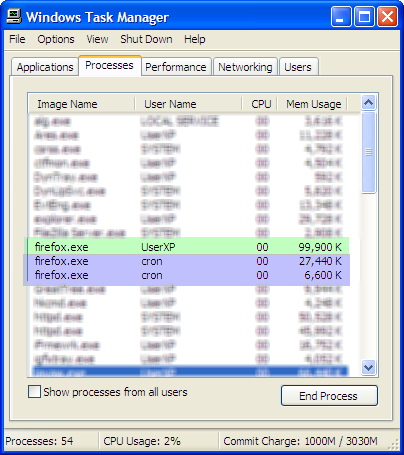
you can open Task Manger to see if it working or not. Press CTRL+ALT+DEL simultaneously to bring your Task Manager.
Go to Processes tab and look for firefox. p/s: please close your browser (firefox) before hand.

UserXP : My current log-on user
cron : Username for the cron job
SOME NOTE
This tutorial is based on Windows XP SP2 build 2.6. But, the step should be the same with all windows version
STEP 1
open Scheduled Task.
start > Accessories > System Tools > Scheduled Tasks
You should now have this nice windows appear on the screen.

STEP 2
double click on Add Scheduled Task

Press Next.
Choose your favourite Browser. In this tutorial, i choose Mozilla firefox.

Press Next when you done.
Now, put the name of cron Job. Here, you can see that i put Cron Tutorial, and of course you can put whatever you like.
In This step also, you must choose the time when Windows executed the cron job. Here i choose Daily

Press Next when you satisfied.
Choose the time for the cron job to start. By default, current time will be shown in the input boxes.
the next option is to tell the scheduler to run your cron job.
The dropdown boxes is to tell the scheduler when to start your cron job. By default, current date will be shown.

Press Next when you done.
This screen is the tricky part. If you only have ONE user in your computer, it is advisable to create one more user with any privilages (i.e any privilages can be use Admin or Limited) plus you MUST provide a password for the newly created user.
If do not wish to create another user, and your current user already password enable then you can use your current user in the next screen.
If your current user do not have password, then you must create password for it or you can choose to create another user with password enable.

Press Next when you done.
On the next screen, before you press Finish make sure you check the check box that say "Open advanced task when i click finish"

Now We finish setting up the cron job. Next step is to tweak your cron job a little bit.
STEP 3

This will be on your screen right now.
To make sure that your cron job running correctly, you must provide the full path of your script. in this example, our script will be located in this location;
D:/xampp/htdocs/path/to/cron/script.php
Please see the path carefully. Normal path in windows will be like this:
D:\xampp\htdocs\path\to\cron\script.php
on the above screen, put the full path to your script next to C:\PROGRA~1\MOZILL~1\firefox.exe
so, the screen will look like this:

the value in Run textboxes will be like this:
C:\PROGRA~1\MOZILL~1\firefox.exe D:/xampp/htdocs/path/to/cron/script.php
there is a space in between C:\PROGRA~1\MOZILL~1\firefox.exe and D:/xampp/htdocs/path/to/cron/script.php
Next, go to Schedule tab and click the Advanced button.
Here will be the screen that you should see.

when you click advanced

check the check box next to Repeat task and fill the content to your like.
here is my setting(i.e you may tweak it to suit your need)

1 : i want the cron job to run every 1 hour
2 : the cron job will run for 23 hours a day continuously
3 : the cron job will be terminated if it still running when the time to run the cron job come again.
STEP 4
to check whether your cron job is running as you wanted, you can change the time by double-clicking your cron job and go to scheduled tab. Alter the run time to past 5 minute or less with your current time.
After that, you can read some other article in this blog while waiting for that 5 minutes. hee~~
When the time come, you might expect your browser to pop-up and start executing your script. Well, you are wrong!! You will not see the browser to pop-up as you expected because it will run in the background silently.
you can open Task Manger to see if it working or not. Press CTRL+ALT+DEL simultaneously to bring your Task Manager.
Go to Processes tab and look for firefox. p/s: please close your browser (firefox) before hand.
cron : Username for the cron job
December 5, 2009
How to place image side by side
If you are a Blogger or MySpace user, you might have a thought like "How do i put two picture's side by side horizontally instead of stack up and down vertically?". Well, i do have the thought so here i'm sharing you this little trick to do the job.
There two ways you can do this.
1. Using the TABLE tag and
2. Simply put your IMG tag next to each other
I'm going to use this picture as an example.


As you can see, the picture is already side by side even when i didn't put any format.
I just simply put the link side by side like this:
But, this is only applicable if your is in a small width and height. It will not work if your picture has greate height and width
Plus, your source code/HTML code will too complicated for you to read for future reference.
Using TABLE
To use TABLE to format your picture, simply use this following code:
This is the outcome of the code:
That's it, now you can make your picture go side by side
There two ways you can do this.
1. Using the TABLE tag and
2. Simply put your IMG tag next to each other
I'm going to use this picture as an example.
As you can see, the picture is already side by side even when i didn't put any format.
I just simply put the link side by side like this:
<img src="#1" /> <img src="#2" />Or you also can add the ALIGN tag in your IMG code
<img align="left" src="#1" /> <img align="left" src="#2" />So, the picture will align themselves like this
But, this is only applicable if your is in a small width and height. It will not work if your picture has greate height and width
Plus, your source code/HTML code will too complicated for you to read for future reference.
Using TABLE
To use TABLE to format your picture, simply use this following code:
<table border="0" cellpadding="2" cellspacing="2"><tbody>
<tr>
<img src="IMAGE URL 01" />
<img src="IMAGE URL 2" />
</tr>
</tbody></table>
Where IMAGE URL is your image link.
This is the outcome of the code:

That's it, now you can make your picture go side by side
November 24, 2009
BUX TO - autoclicker and multiclicker
Bux.to is a PTC (Paid To Click) program where they offer you $0.01 for every click you make.
A lot of people have claim that this site is a scam but a lot of people too claim that they had been paid a few time. But i just request my payment ($450) and i'm still waiting for it because i know they take a lot of time to processed every payment.
This post will teach you how to make easy money with Bux.to without CHEATING.
before you begin, you need a real account with ALERTPAY. What i mean a real account is, you must provide your real name, real address, and some banking info. Because if don't provide this information, you can't withdraw your money from Alertpay.
Sign-up a free account from alertpay http://www.alertpay.com
step 1
go to Bux.to and register for Bux.to account. put kuyau in the referral field and read the rest of this post to know why.
step 2
THIS TRICK IS FOR MOZILLA FIREFOX USER
In firefox, navigate to tools and click Add-ons
when the Add-ons windows appear, go to Get add-ons tab and search for greasemonkey.
Install this add-on and you are ready for the next step.
When you finish installing the add-ons, go to userscript.org and get the Bux.to autoclicker. it's located here >> http://userscripts.org/scripts/show/38267. Click the green button that say install. Greasemonkey will automatically fetch the script.
step 3
Now, login to your Bux.to account and watch the magic happen.
when you login, the script that you get from userscript.org should automatically take you to the surf page. if it's not, then you can go there manually. click the surf ads and you can see that a timer appear and the script do all the clicking for you.
oh, you MUST allow pop-up from Bux.to in order to use the script.
FOR INTERNET EXPLORER, NETSCAPE, OPERA AND OTHER BROWSER USER
step 1
same as above, register an account at Bux.to. put kuyau in the referral field. you won't lose any of your income but increase a little.
A normal payout for every click you made is $0.01. but when you sign with that referral, every click you made worth $0.015.
step 2
ok, here's the trick.
login to your account as usual and go to surf ads
click on of the link and wait for to timer to expire (30 seconds). when the time expired, wait for the confirmation to appear. it will say done with a green check.
Now the fun part, in address bar, you'll see the link of the ads. like this
now, add 0 (zero) in front of the number. (like this)
the time start is ticking again! :D. now, wait again until expired and wait for the confirmation to appear.
When it appear, add 0 again in the address bar like this.
do this until you satisfied and move to the next ads.
ok, let's do some math.
if your current ad count is 10, your income is $0.10.
but, if you put 10 zero in front of every of your current ad count, one ad is worth $0.15
and you have 10 ads that means,
ow.. in just a month, you are ready to cash out your FREE MONEY!!!!
Bux.to is not that cheap. Everyday, they will give you 26 to 32 (max) ads for to click.
if you add 10 zero for 20 ads, that means your income for 25 ads is $3.75!!
That's a lot of money you get for just clicking and ads.
A lot of people have claim that this site is a scam but a lot of people too claim that they had been paid a few time. But i just request my payment ($450) and i'm still waiting for it because i know they take a lot of time to processed every payment.
This post will teach you how to make easy money with Bux.to without CHEATING.
before you begin, you need a real account with ALERTPAY. What i mean a real account is, you must provide your real name, real address, and some banking info. Because if don't provide this information, you can't withdraw your money from Alertpay.
Sign-up a free account from alertpay http://www.alertpay.com
step 1
go to Bux.to and register for Bux.to account. put kuyau in the referral field and read the rest of this post to know why.
step 2
THIS TRICK IS FOR MOZILLA FIREFOX USER
In firefox, navigate to tools and click Add-ons
when the Add-ons windows appear, go to Get add-ons tab and search for greasemonkey.
Install this add-on and you are ready for the next step.
When you finish installing the add-ons, go to userscript.org and get the Bux.to autoclicker. it's located here >> http://userscripts.org/scripts/show/38267. Click the green button that say install. Greasemonkey will automatically fetch the script.
step 3
Now, login to your Bux.to account and watch the magic happen.
when you login, the script that you get from userscript.org should automatically take you to the surf page. if it's not, then you can go there manually. click the surf ads and you can see that a timer appear and the script do all the clicking for you.
oh, you MUST allow pop-up from Bux.to in order to use the script.
FOR INTERNET EXPLORER, NETSCAPE, OPERA AND OTHER BROWSER USER
step 1
same as above, register an account at Bux.to. put kuyau in the referral field. you won't lose any of your income but increase a little.
A normal payout for every click you made is $0.01. but when you sign with that referral, every click you made worth $0.015.
step 2
ok, here's the trick.
login to your account as usual and go to surf ads
click on of the link and wait for to timer to expire (30 seconds). when the time expired, wait for the confirmation to appear. it will say done with a green check.
Now the fun part, in address bar, you'll see the link of the ads. like this
http://www.bux.to/view.php?ad=110714
now, add 0 (zero) in front of the number. (like this)
http://www.bux.to/view.php?ad=0110714
the time start is ticking again! :D. now, wait again until expired and wait for the confirmation to appear.
When it appear, add 0 again in the address bar like this.
http://www.bux.to/view.php?ad=00110714
do this until you satisfied and move to the next ads.
ok, let's do some math.
if your current ad count is 10, your income is $0.10.
but, if you put 10 zero in front of every of your current ad count, one ad is worth $0.15
and you have 10 ads that means,
10 ads * 10 zero = 100 ads
100 ads * $0.015 = $1.50
your income for one week is $1.50 * 7 days = $10.50
your income for one month is $10.50 * 30 days = $315
W
ow.. in just a month, you are ready to cash out your FREE MONEY!!!!
Bux.to is not that cheap. Everyday, they will give you 26 to 32 (max) ads for to click.
if you add 10 zero for 20 ads, that means your income for 25 ads is $3.75!!
That's a lot of money you get for just clicking and ads.
November 6, 2009
Computer Accronym
A simple dictionary about short-senteces in computer world.
A | B | C | D | E | F | G | H | I | J | K | L | M | N | O | P | Q | R | S | T | U | V | W | X | Y | Z |
A | B | C | D | E | F | G | H | I | J | K | L | M | N | O | P | Q | R | S | T | U | V | W | X | Y | Z |
ADSL
Asymmetric Digital Subscriber Line

AGP
Accelerated Graphics Port

ALI
Acer Labs, Incorporated

ALU
Arithmetic Logic Unit

AMD
Advanced Micro Devices

APC
American Power Conversion

ASCII
American Standard Code for Information Interchange

ASIC
Application Specific Integrated Circuit

ASPI
Advanced SCSI Programming Interface

AT
Advanced Technology

ATIATI
Technologies Inc.

ATX
Advanced Technology Extended
BFG
BFG Technologies

BIOS
Basic Input Output System

BNC
Barrel Nut Connector
CAS
Column Address Signal

CD
Compact Disk

CDR
Compact Disk Recorder

CDRW
Compact Disk Re-Writer

CD-ROM
Compact Disk - Read Only Memory

CFM
Cubic Feet per Minute (ft/min)

CMOS
Complementary Metal Oxide Semiconductor

CPU
Central Processing Unit

CTX
CTX Technology Corporation (Commited to Excellence)
DDR
Double Data Rate

DDR-SDRAM
Double Data Rate - Synchronous Dynamic Random Access Memory

DFI
DFI Inc. (Design for Innovation)

DIMM
Dual Inline Memory Module

DRAM
Dynamic Random Access Memory

DPI
Dots Per Inch

DSL
See ASDL

DVD
Digital Versatile Disc

DVD-RAM
Digital Versatile Disk - Random Access Memory
ECC
Error Correction Code

ECS
Elitegroup Computer Systems

EDO
Extended Data Out

EEPROM
Electrically Erasable Programmable Read-Only Memory

EPROM
Erasable Programmable Read-Only Memory

EVGA
EVGA Corporation
FC-PGA
Flip Chip Pin Grid Array

FDC
Floppy Disk Controller

FDD
Floppy Disk Drive

FPS
Frame Per Second

FPU
Floating Point Unit

FSAA
Full Screen Anti-Aliasing

FS
For Sale

FSB
Front Side Bus
GB
Gigabytes

GBps
Gigabytes per second or Gigabits per second

GDI
Graphical Device Interface

GHz
GigaHertz
HDD
Hard Disk Drive

HIS
Hightech Information System Limited

HP
Hewlett-Packard Development Company

HSF
Heatsink-Fan
IBM
International Business Machines Corporation

IC
Integrated Circuit

IDE
Integrated Drive Electronics

IFS
Item for Sale

IRQ
Interrupt Request

ISA
Industry Standard Architecture

ISO
International Standards Organization
JBL
JBL (Jame B. Lansing) Speakers

JVC
JVC Company of America
Kbps
Kilobits Per Second

KBps
KiloBytes per second
LG
LG Electronics

LAN
Local Area Network

LCD
Liquid Crystal Display

LDT
Lightning Data Transport

LED
Light Emitting Diode
MAC
Media Access Control

MB
MotherBoard or Megabyte

MBps
Megabytes Per Second

Mbps
Megabits Per Second or Megabits Per Second

MHz
MegaHertz

MIPS
Million Instructions Per Second

MMX
Multi-Media Extensions

MSI
Micro Star International
NAS
Network Attached Storage

NAT
Network Address Translation

NEC
NEC Corporation

NIC
Network Interface Card
OC
Overclock (Over Clock)

OCZ
OCZ Technology

OEM
Original Equipment Manufacturer
PC
Personal Computer

PCB
Printed Circuit Board

PCI
Peripheral Component Interconnect

PDA
Personal Digital Assistant

PCMCIA
Peripheral Component Microchannel Interconnect Architecture

PGA
Professional Graphics Array

PLD
Programmable Logic Device

PM
Private Message / Private Messaging

PnP
Plug 'n Play

PNY
PNY Technology

POST
Power On Self Test

PPPoA
Point-to-Point Protocol over ATM

PPPoE
Point-to-Point Protocol over Ethernet

PQI
PQI Corporation

PSU
Power Supply Unit
RAID
Redundant Array of Inexpensive Disks

RAM
Random Access Memory

RAMDAC
Random Access Memory Digital Analog Convertor

RDRAM
Rambus Dynamic Random Access Memory

ROM
Read Only Memory

RPM
Revolutions Per Minute
SASID
Self-scanned Amorphous Silicon Integrated Display

SCA
SCSI Configured Automatically

SCSI
Small Computer System Interface

SDRAM
Synchronous Dynamic Random Access Memory

SECC
Single Edge Contact Connector

SODIMM
Small Outline Dual Inline Memory Module

SPARC
Scalable Processor ArChitecture

SOHO
Small Office Home Office

SRAM
Static Random Access Memory

SSE
Streaming SIMD Extensions

SVGA
Super Video Graphics Array

S/PDIF
Sony/Philips Digital Interface
TB
Terabytes

TBps
Terabytes per second

Tbps
Terabits per second

TDK
TDK Electronics

TEC
Thermoelectric Cooler

TPC
TipidPC

TWAIN
Technology Without An Important Name
UART
Universal Asynchronous Receiver/Transmitter

USB
Universal Serial Bus

UTP
Unshieled Twisted Pair
VCD
Video CD

VPN
Virtual Private Network
WAN
Wide Area Network

WTB
Want to Buy

WYSIWYG
What You See Is What You Get
XGA
Extended Graphics Array

XFX
XFX Graphics, a Division of Pine

XMS
Extended Memory Specification

XT
Extended Technology
How to add your own windows tips
Seeing the same tips every time you logon in windows might make you to puke because you see it almost every day, every minute, or even every second (because you reboot every second :D). Here's a little tips you can do to make you own tips
Open your registry and find the key below.
Create a new string valued named by incrementing the existing value names and set it to the required tip text.
That's it, you are done!
Open your registry and find the key below.
HKEY_LOCAL_MACHINE\ SOFTWARE\ Microsoft\ Windows\ CurrentVersion\ Explorer\ Tips
Create a new string valued named by incrementing the existing value names and set it to the required tip text.
That's it, you are done!
October 23, 2009
Easy chating in windows XP using Command Prompt
Chatting through a PC on a network is possible in windows XP. Although, you can only 'talk' with one computer at a time because you can only type one IP Address at a time.
to see your current IP Address, feed your CMD with this command
To start you chat session, fire-up your favorite text editor (like Notepad or Notepad++ and use your copy/paste ability to get the code below:
now, save this code with any name you like but you MUST put the .bat extension. To save in notepad, go to file>Save As.. then save it like this: "chatter.bat" - including the quotes!.
NOw, go to the location where you save the file and double-click it
You should see something like this:
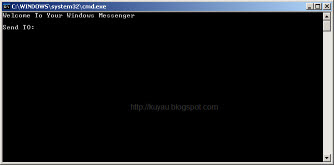
After “Send TO” type the IP address of the computer you want to contact.
You should see this:

Now type in the message you would like to send.
Before you press “Enter” it should look like this:
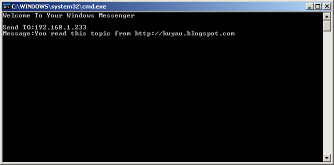
Now press “Enter”, and start chatting!
to see your current IP Address, feed your CMD with this command
ipconfigor you can also use
ipconfig /allto see all of your network card IP Address.
To start you chat session, fire-up your favorite text editor (like Notepad or Notepad++ and use your copy/paste ability to get the code below:
@echo off
:A
cls
echo Welcome To Your Windows Messenger
echo.
set /p n=Send TO:
set /p m=Message:
net send %n% %m%
Pause
Goto A
now, save this code with any name you like but you MUST put the .bat extension. To save in notepad, go to file>Save As.. then save it like this: "chatter.bat" - including the quotes!.
NOw, go to the location where you save the file and double-click it
You should see something like this:

After “Send TO” type the IP address of the computer you want to contact.
You should see this:

Now type in the message you would like to send.
Before you press “Enter” it should look like this:

Now press “Enter”, and start chatting!
September 21, 2009
Facebook Smiley Icon (emoticon) in Chat space
A list of Facebook emoticon and short-cut.
to activate the emoticon, simply type the short-cut in the chat space and press ENTER. You wont see the short-cut but instead, you'll see some emoticon.
ONLY TYPE OR COPY/PASTE THE TEXT IN BOLD
:-* - kiss
^_^ - “kiki”
-_- - squint
O.o - confused
>:O - upset
:v - Pacman
:|] - robot
:) - happy
:( - sad
:P - tongue
:D - grin
:O - gasp
;) - wink
8) - glasses
B) - sunglasses
:3 - cute/cat-like
>:( - grumpy
:/ - unsure
:’( - cry
3:) - devil
O:) - angel
:putnam: - Chris Putnam (Facebook Engineer)
September 18, 2009
Proxy Script
There are a lot of proxy script available on the net but i love to use this one, Glype Proxy script.
Glype proxy script is light and has a very simple web interface. Plus, you can choose to save or delete cookies from the server.
you can get Glype in here >> http://www.glype.com/downloads
How To Use?
If you lost or don't know how to use this script, refer to the ReadMe section that included in the packages.
to put it simply, the packege contain two(2) folder: upload and Extras.
The most important thing is the Upload folder. upload all the content of this folder to your webserver and you can start using it right away.
For advanced user, you can also upload all the file from the Extras folder to your web server too.
***THINGS TO REMEMBER
When you upload the files from the Extras folder, make sure you upload it in the same place where you upload the content from the Upload folder.
Meaning, all file from both folder will be at the location when you upload it to your web server.
After that, happy Proxying!!
September 5, 2009
Saving Photobucket picture and album
This topic has been discussed on many blog and website but i decided to write it on my own experience. I asked my friend to give some photo and told him to email it to me but it is to big to be emailed. So i asked hime to upload it to some free file hosting but he refuse because the number of download is limited and the file will be gone before i knew it. so, he upload all his 250 picture to photobucket and give the link to his album.
CLICK PICTURE FOR LARGER PREVIEW!
And of course, i don't want to waste my time clicking and saving the picture one-by-one at a time. because if i do that, i'll have to open 250 pages of picture. WOOooOOO!!!!
Luckily, i encounter this one tutorial about downloading the whole album from photobucket but sadly, it's outdated.
so, i made a few tweak to the tutorial and voiLLa.. i manage to download all of the picture in about 1 minute.
Follow this tutorial...
Getting the ALBUM link
If you have some friends who had uploded their picture on Photobucket, you should ask them about the link to their album.
or, if juz want to download some picture from other people album (a total stranger to you).
basically, you can use the search function in photobucket or just use the readily-made-for-you tags.
when you click the tags or use the search function, you will be presented by the result
when you hover to one of the picture, it will show you the author (the uploader) name color in blue.
![[author name]](https://blogger.googleusercontent.com/img/b/R29vZ2xl/AVvXsEh93X_ugBzvjoPqLyply-lvkhwqm86G4k1Qs7TriebrT1r7qrSt8MoGl3OPGeu-xzAyrCMl5Jryyt3d6P-aTf8fIU4R9SjRzu1_6jWdN12cjEV0Gyt2HZytWpgLowRBIC9iQlyQJWkBn1w/s400/author_t.gif)
the author's name can be used as the album link to. if you click the name, you'll be redirected the album. here, you will see the picture he/she has uploaded.
![[uploaded picture]](https://blogger.googleusercontent.com/img/b/R29vZ2xl/AVvXsEihC7nXW1Uy9xmeE98KB9HEvqg-fCdpHFE9ETaPj6pOmsJMvMSUXLQ5fOWPkeOCqSWNHwsDnCU4v3JRRIFpdy26fzIVxrz3Zxdkx6ScnZJ4nI5o8H4dFaiQ2J_89N2enSNxoTp-FmqH7qs/s400/album_inside_t.gif)
 DownThemAll
to download all the picture in the current album or all picture uploaded by the author, first you should get this Add-ons (FIREFOX 3.0 and above only) called DownThemAll
ok, when you done adding the add-ons you are good to go.
Downloading the Album
Go to the album, and reach the end of the document. Find the View All and click it.
![[view all]](https://blogger.googleusercontent.com/img/b/R29vZ2xl/AVvXsEgfuKiyh7U6YDI-mk7Ivwpr8SRVL-QWCkpdfOZSctuL-wtbnrBm5_HWS2UyeQ7MUwIDWarjQreZxbdCyz0iVgq_BHFoM1vKPSa_yN2log21qpO8Ek4wHtYVZ8kSGy96dofMlI-qJdmP9CI/s400/view_all_t.gif)
*** the view all link will only appear if the author has too many pictures to fit in one pages.
you can all add this at the end of the album URL: ?start=all
now, all the picture of the current album is fit into one pages.
next, go to end of the document and locate the feed for this album link.
![[ feed for this album link ]](https://blogger.googleusercontent.com/img/b/R29vZ2xl/AVvXsEhvYzbTMAF2p6KW_M6eK5Y2IDcu98SqvXem5moGHS6gA1i4VBKlgixFeuaY4YDTjtSJGB5Rlb16kBKyWJVtt1ImEaKJy-pFTo-wdssIT8ICz5QDSRN78sHZLU-axIZR5hJ8U-In7Ci0MN0/s400/feed_t.gif)
click the link and you get the feed of the album.
![[Album Feed]](https://blogger.googleusercontent.com/img/b/R29vZ2xl/AVvXsEjxbXIbWxxpuBb_sT9Jd0M9s9XLV-zIOVwVFf0GXbDXr7ETWEvZwVNu1ChWx1j15krr_tUHzoh6YjB6iwIcSiBfqi9yPPpjxqxxfjbaVxm6tCDb45jXVCkFTqVBqdP79Lgh9qhz7Ok5b30/s400/fedd_item_t.gif)
now, right-click on the pages and click. You'll see the DownThemAll menu in there.
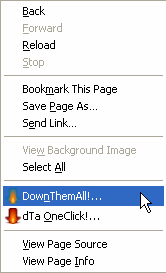
click it and proceed to next screen
![[down them all downloading picture]](https://blogger.googleusercontent.com/img/b/R29vZ2xl/AVvXsEjwdWapoJo0-K9OLj90L_DtaXVnk1STgBd1diiHLMwS-4sU42Edg8gQwu8B0p4UfwUjb272EfxJp5PA_reG86-dRwc3YnDW3tKKfvrAGxTTCx_uvt74pcJNwfqB0Azfnk81Bt5RfV5rMjo/s400/downthemall_download_t.gif)
and you are finish. DownThemAll will automatically download all the picture for you.
![[downthemall screen]](https://blogger.googleusercontent.com/img/b/R29vZ2xl/AVvXsEhyqPdTjG3MWjmT8sqoSuz_Fbv5hYyCG76MuLAAsJY-5eTg6xF92rmEWQVtMrAi-OL2ggnteO0rMFIbNmgg7h_V2k9uzNDuOzs04FV-WpSHDPC7hrPBAbgszCDiE7Jf4isCnx-RbcpqB0U/s400/downthemall_t.gif)
Have Fun!!!
CLICK PICTURE FOR LARGER PREVIEW!
And of course, i don't want to waste my time clicking and saving the picture one-by-one at a time. because if i do that, i'll have to open 250 pages of picture. WOOooOOO!!!!
Luckily, i encounter this one tutorial about downloading the whole album from photobucket but sadly, it's outdated.
so, i made a few tweak to the tutorial and voiLLa.. i manage to download all of the picture in about 1 minute.
Follow this tutorial...
Getting the ALBUM link
If you have some friends who had uploded their picture on Photobucket, you should ask them about the link to their album.
or, if juz want to download some picture from other people album (a total stranger to you).
basically, you can use the search function in photobucket or just use the readily-made-for-you tags.
when you click the tags or use the search function, you will be presented by the result
when you hover to one of the picture, it will show you the author (the uploader) name color in blue.
![[author name]](https://blogger.googleusercontent.com/img/b/R29vZ2xl/AVvXsEjbvYk68E_jIi1eQ0IYUrgwQF5uv3TlnpB7qIzJjqCXBG1gQHBbtVuUKmrcSXH4nzEtvnSjqepObiPfoCqvOh-PaMZO-6HsnjnW4t4Ze-UTjQVbnk4EzZyUtvG4RCE9eXnVNhqEay2soK4/s1600/author.gif)
the author's name can be used as the album link to. if you click the name, you'll be redirected the album. here, you will see the picture he/she has uploaded.
![[uploaded picture]](https://blogger.googleusercontent.com/img/b/R29vZ2xl/AVvXsEihAPkBIvpzwIf61kzUy1kOYWemeB5ocD4MtGln8IBVZ1lFofNv_sVVck_m4b06M8eYCPStOwsFkfoKdJNWr_6ZbpXoFwoSQUmRjYSKKAQdQVc-Cg9aRbsSdpLeeNR5f1FmfMp-bMFHd5M/s1600/album_inside.gif)
to download all the picture in the current album or all picture uploaded by the author, first you should get this Add-ons (FIREFOX 3.0 and above only) called DownThemAll
ok, when you done adding the add-ons you are good to go.
Downloading the Album
Go to the album, and reach the end of the document. Find the View All and click it.
![[view all]](https://blogger.googleusercontent.com/img/b/R29vZ2xl/AVvXsEg-BrKwT0_LPdsOuxGR9UxkcE40A67jPvqsD7cUWMOyfP3iWnQHEbLfeUn9B1Veq3YZ5BSiRUCQmqDGmMUgSqyvi89j_28yx313s6-fmhTSu7feJgflAV2d1YF4m3J9rSm_hDny8PAoiwA/s1600/view_all.gif)
*** the view all link will only appear if the author has too many pictures to fit in one pages.
you can all add this at the end of the album URL: ?start=all
now, all the picture of the current album is fit into one pages.
next, go to end of the document and locate the feed for this album link.
![[ feed for this album link ]](https://blogger.googleusercontent.com/img/b/R29vZ2xl/AVvXsEi92IhsR78dcGiaDPjA_KplHhh7ErXYS_lkonGmaD5sf5d7ERWsbgjnfe9yAQ6EwnS-khNusQBP_DVn0WhyphenhyphenkSslTUoyeAL1pVPyPAm_k_9h6IxArwqJbjA7nEYt6coJnPVeK8zi1hvigHo/s1600/feed.gif)
click the link and you get the feed of the album.
![[Album Feed]](https://blogger.googleusercontent.com/img/b/R29vZ2xl/AVvXsEh3opi80fkwyPXII7JQ2yq4jOP4g4f6QSLX4WnUZzSU0M4A6XdYNCAQHLkX7M4kzw2j-qinKuLpn1hBSf-EFqn9waCzGje3kASqZXQIGpwcujyIvF4Wh_zgIIsGEr9e8pqCBdwiS2uWzpc/s1600/fedd_item.gif)
now, right-click on the pages and click. You'll see the DownThemAll menu in there.

click it and proceed to next screen
![[down them all downloading picture]](https://blogger.googleusercontent.com/img/b/R29vZ2xl/AVvXsEi3VTbuka27VQunptcGBuH47A3ac9c_6E5EurpsfSBcBnbIh8bPa0-JHTTsb6XsP5_XUwkok0PzvfDBZxRYb7WdekO2-j9mONNOy5DGuUcUElClB_3bd-sy8D7b4r7nlnw3W8JWV-63KnE/s1600/downthemall_download.gif)
and you are finish. DownThemAll will automatically download all the picture for you.
![[downthemall screen]](https://blogger.googleusercontent.com/img/b/R29vZ2xl/AVvXsEjYblUydFCVphy7yW1a7Ql1tkc8tXu42K97lAmuicDXDtZHhaPV_QVIN7iYS7lyq6YPLXN1tL-B1Z3ncLnGw7B9ojKakk7hM5-d_rR_LAG7966rm0hTJB7RUYski9TFOabU-Y6OP0Zgj-g/s1600/downthemall.gif)
Have Fun!!!
Subscribe to:
Posts (Atom)