December 25, 2009
Javascript Color Picker
this nice javascript will show the hex code for all color. This script is a MUST if you are a webdesigner.
December 24, 2009
How to configure cron job in windows
cron job can make your life easier than you ever thought. even though, cron job is not much popular in most web hosting that running windows as their platform. Most people that have a script to automate their website (i.e backup) tend to choose web hosting that run in Linux because setting up cron in Linux is far more easier than in windows.
SOME NOTE
This tutorial is based on Windows XP SP2 build 2.6. But, the step should be the same with all windows version
STEP 1
open Scheduled Task.
You should now have this nice windows appear on the screen.

STEP 2
double click on Add Scheduled Task

Press Next.
Choose your favourite Browser. In this tutorial, i choose Mozilla firefox.

Press Next when you done.
Now, put the name of cron Job. Here, you can see that i put Cron Tutorial, and of course you can put whatever you like.
In This step also, you must choose the time when Windows executed the cron job. Here i choose Daily

Press Next when you satisfied.
Choose the time for the cron job to start. By default, current time will be shown in the input boxes.
the next option is to tell the scheduler to run your cron job.
The dropdown boxes is to tell the scheduler when to start your cron job. By default, current date will be shown.

Press Next when you done.
This screen is the tricky part. If you only have ONE user in your computer, it is advisable to create one more user with any privilages (i.e any privilages can be use Admin or Limited) plus you MUST provide a password for the newly created user.
If do not wish to create another user, and your current user already password enable then you can use your current user in the next screen.
If your current user do not have password, then you must create password for it or you can choose to create another user with password enable.

Press Next when you done.
On the next screen, before you press Finish make sure you check the check box that say "Open advanced task when i click finish"

Now We finish setting up the cron job. Next step is to tweak your cron job a little bit.
STEP 3

This will be on your screen right now.
To make sure that your cron job running correctly, you must provide the full path of your script. in this example, our script will be located in this location;
Please see the path carefully. Normal path in windows will be like this:
on the above screen, put the full path to your script next to C:\PROGRA~1\MOZILL~1\firefox.exe
so, the screen will look like this:

the value in Run textboxes will be like this:
there is a space in between C:\PROGRA~1\MOZILL~1\firefox.exe and D:/xampp/htdocs/path/to/cron/script.php
Next, go to Schedule tab and click the Advanced button.
Here will be the screen that you should see.

when you click advanced

check the check box next to Repeat task and fill the content to your like.
here is my setting(i.e you may tweak it to suit your need)
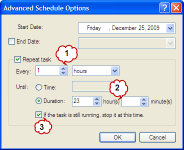
My reason:
1 : i want the cron job to run every 1 hour
2 : the cron job will run for 23 hours a day continuously
3 : the cron job will be terminated if it still running when the time to run the cron job come again.
STEP 4
to check whether your cron job is running as you wanted, you can change the time by double-clicking your cron job and go to scheduled tab. Alter the run time to past 5 minute or less with your current time.
After that, you can read some other article in this blog while waiting for that 5 minutes. hee~~
When the time come, you might expect your browser to pop-up and start executing your script. Well, you are wrong!! You will not see the browser to pop-up as you expected because it will run in the background silently.
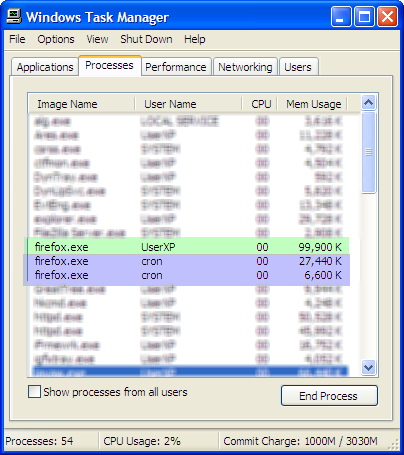
you can open Task Manger to see if it working or not. Press CTRL+ALT+DEL simultaneously to bring your Task Manager.
Go to Processes tab and look for firefox. p/s: please close your browser (firefox) before hand.

UserXP : My current log-on user
cron : Username for the cron job
SOME NOTE
This tutorial is based on Windows XP SP2 build 2.6. But, the step should be the same with all windows version
STEP 1
open Scheduled Task.
start > Accessories > System Tools > Scheduled Tasks
You should now have this nice windows appear on the screen.

STEP 2
double click on Add Scheduled Task

Press Next.
Choose your favourite Browser. In this tutorial, i choose Mozilla firefox.

Press Next when you done.
Now, put the name of cron Job. Here, you can see that i put Cron Tutorial, and of course you can put whatever you like.
In This step also, you must choose the time when Windows executed the cron job. Here i choose Daily

Press Next when you satisfied.
Choose the time for the cron job to start. By default, current time will be shown in the input boxes.
the next option is to tell the scheduler to run your cron job.
The dropdown boxes is to tell the scheduler when to start your cron job. By default, current date will be shown.

Press Next when you done.
This screen is the tricky part. If you only have ONE user in your computer, it is advisable to create one more user with any privilages (i.e any privilages can be use Admin or Limited) plus you MUST provide a password for the newly created user.
If do not wish to create another user, and your current user already password enable then you can use your current user in the next screen.
If your current user do not have password, then you must create password for it or you can choose to create another user with password enable.

Press Next when you done.
On the next screen, before you press Finish make sure you check the check box that say "Open advanced task when i click finish"

Now We finish setting up the cron job. Next step is to tweak your cron job a little bit.
STEP 3

This will be on your screen right now.
To make sure that your cron job running correctly, you must provide the full path of your script. in this example, our script will be located in this location;
D:/xampp/htdocs/path/to/cron/script.php
Please see the path carefully. Normal path in windows will be like this:
D:\xampp\htdocs\path\to\cron\script.php
on the above screen, put the full path to your script next to C:\PROGRA~1\MOZILL~1\firefox.exe
so, the screen will look like this:

the value in Run textboxes will be like this:
C:\PROGRA~1\MOZILL~1\firefox.exe D:/xampp/htdocs/path/to/cron/script.php
there is a space in between C:\PROGRA~1\MOZILL~1\firefox.exe and D:/xampp/htdocs/path/to/cron/script.php
Next, go to Schedule tab and click the Advanced button.
Here will be the screen that you should see.

when you click advanced

check the check box next to Repeat task and fill the content to your like.
here is my setting(i.e you may tweak it to suit your need)

1 : i want the cron job to run every 1 hour
2 : the cron job will run for 23 hours a day continuously
3 : the cron job will be terminated if it still running when the time to run the cron job come again.
STEP 4
to check whether your cron job is running as you wanted, you can change the time by double-clicking your cron job and go to scheduled tab. Alter the run time to past 5 minute or less with your current time.
After that, you can read some other article in this blog while waiting for that 5 minutes. hee~~
When the time come, you might expect your browser to pop-up and start executing your script. Well, you are wrong!! You will not see the browser to pop-up as you expected because it will run in the background silently.
you can open Task Manger to see if it working or not. Press CTRL+ALT+DEL simultaneously to bring your Task Manager.
Go to Processes tab and look for firefox. p/s: please close your browser (firefox) before hand.
cron : Username for the cron job
December 5, 2009
How to place image side by side
If you are a Blogger or MySpace user, you might have a thought like "How do i put two picture's side by side horizontally instead of stack up and down vertically?". Well, i do have the thought so here i'm sharing you this little trick to do the job.
There two ways you can do this.
1. Using the TABLE tag and
2. Simply put your IMG tag next to each other
I'm going to use this picture as an example.


As you can see, the picture is already side by side even when i didn't put any format.
I just simply put the link side by side like this:
But, this is only applicable if your is in a small width and height. It will not work if your picture has greate height and width
Plus, your source code/HTML code will too complicated for you to read for future reference.
Using TABLE
To use TABLE to format your picture, simply use this following code:
This is the outcome of the code:
That's it, now you can make your picture go side by side
There two ways you can do this.
1. Using the TABLE tag and
2. Simply put your IMG tag next to each other
I'm going to use this picture as an example.
As you can see, the picture is already side by side even when i didn't put any format.
I just simply put the link side by side like this:
<img src="#1" /> <img src="#2" />Or you also can add the ALIGN tag in your IMG code
<img align="left" src="#1" /> <img align="left" src="#2" />So, the picture will align themselves like this
But, this is only applicable if your is in a small width and height. It will not work if your picture has greate height and width
Plus, your source code/HTML code will too complicated for you to read for future reference.
Using TABLE
To use TABLE to format your picture, simply use this following code:
<table border="0" cellpadding="2" cellspacing="2"><tbody>
<tr>
<img src="IMAGE URL 01" />
<img src="IMAGE URL 2" />
</tr>
</tbody></table>
Where IMAGE URL is your image link.
This is the outcome of the code:

That's it, now you can make your picture go side by side
Subscribe to:
Posts (Atom)