STEP 1
Open Up your favourite browser and go to you router configuration screen.
To get to the configuration screen, type 192.168.1.254 in the address bar.
** this is my router configuration screen (see Setting Up Home Webserver)
Here is some hint:
1. to check your router configuration address, double-click you Local Area Network (the two computer near the clock).
2. then go to support
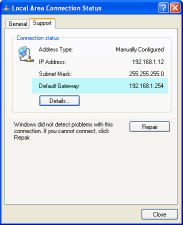
3. Usually, you can type the Default Gateway as the address in your browser. That is usually the address of your router configuration screen.
STEP 2
Setting static IP Address for your computer.
If your ip address keep changing everytime you online, you can't put your server available to your friends or everyone on the net.
fill up your information when the browser ask for username and password.

If you provide correct information, you'll be redirected to screen similiar to this.
**of course, it depend on the type of router that you use.
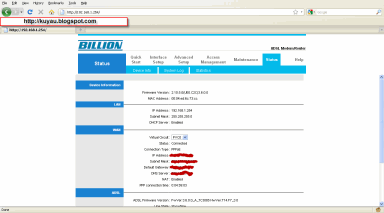
Go to Interface Setup then click the LAN tab.
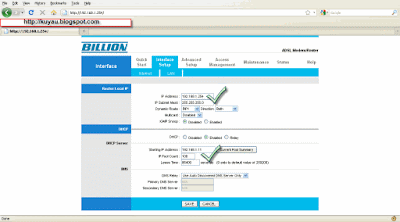
Fill up the setting according to the picture.
Keep in mind that
brouter Local Ip is according to your router configuration site address
mine is 192.168.1.254
Ip Subnet Mask is THE SAME AS IN THE PICTURE
For the DHCP SERVER, you can put any number as long as it is within your router local IP address.
see picture
if your ROUTER local IP address is 192.168.1.254, then you DHCP SERVER ip address is 192.168.1.11
only change the last 3-digit!!!
STEP 3
Forwarding traffic from internet to communicate with your server
everytime people from internet type in your IP address, there should be forwarded to your server.
To make it happen, go to Advanced Setup >> NAT. Forwarding ip Address to your service can be done from this location using the Virtual Server configuration.
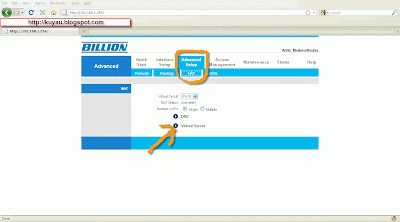
Click the Virtual Server.
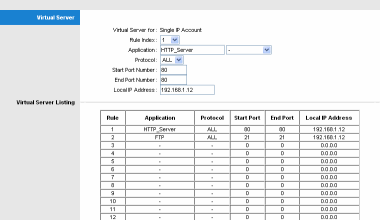
Add rule according to the application you want to use. In this case, HTTP_SERVER.
Select HTTP_Server from the list, then enter your IP Address.
IP address is the IP Address that you assign in DHCP SERVER.
PORT is automatically assign for you. Port for HTTP_SERVER is 80
In the picture i add FTP application but you don't have to add it if you don't have FTP Server.
Save your configuration.
DONE
READ the guide on: Testing Your Home Web Server
No comments:
Post a Comment
Whats your thought on this post?